Background
Resizing partitions is often a necessary task given changing needs and ever-data-hungry applications and services. The need may arise for a variety of reasons, from adding or moving disks to shrinking less used partitions and growing more frequently used partitions. Luckily, several commonly available tools (gparted and/or partition magic) make this task easy, even with a complicated disk layout.
The following example uses a disk layout I’ve wrote about before consisting of a moderately partitioned triple boot (LMDE, Xubuntu, and Crunchbang) laptop. Each OS has a boot, root, swap, tmp, and home partition. As of recent, I use my Xubuntu OS much less and am using Crunchbang much more so I need to grow my Crunchbang and LMDE home partitions. Luckily, I reserved some space when I set up the partitions just for this case; however, you can easily shrink one partition to reclaim space to use (add to) another partition with the following tools/process as well.
Before starting, the standard disclaimers:
- ALWAYS BACKUP ANY/ALL DATA ON PARTITIONS YOU ARE ABOUT TO CHANGE - this is always good practice, although, I’ve never ran into an issue using parted/gparted/partition magic
- Never alter partitions while they are mounted - unless you like corrupting data/partitions/disks
Illustration 1 shows my partition layout prior to starting. sda11 is the Crunchbang ‘home’ partition and sda12 is the LMDE ‘home’ partition. My goal is to add a small amount of the ‘unallocated’ space to the LMDE home partition and add the rest of the unallocated space to the Crunchbang home partition.
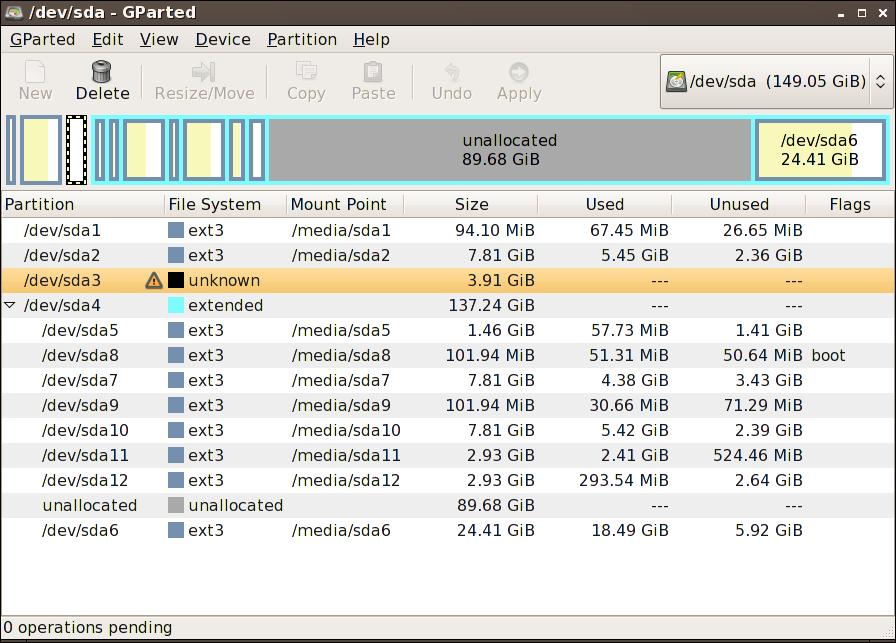
Illustration 1: Original partition layout.
To get started, we will use Parted Magic, a live CD distro with lots of partitioning related tools pre-installed. Grab a copy of Parted Magic, burn it to a disk/usb drive, insert it into your cd/usb slot and reboot. The following steps should take you through the rest of the process:
- Ensure your BIOS allows booting from a CD/USB device and select the CD/USB device as the device to boot from (this will start your computer using the Parted Magic LiveCD)
- As Parted Magic boots you should be presented with a startup mode, select the default and press enter (in a few seconds you should be presented with a somewhat similar desktop with a Start menu in the lower left corner and a few icons on the desktop)
- Select GParted from the desktop (or use the Start menu) as this is where we will do all the work
- As stated earlier, I want to grow the Crunchbang and LMDE ‘home’ partitions (sda11 and sda12 respectively). We do this as follows in Parted Magic:
- Select sda12, right click on it and select Grow/Move. I chose to grow the partition from ~3gb to 10gb and move it to the end of the unallocated space (this allows us to grow sda11 later which appears before sda12 in the partition table)
- Next, select sda11, right click on it and select Grow/Move, I then enter all remaining space in the unallocated space for sda11’s size (note: you can also use the slider above to drag and drop select the size)
- As you performed the above steps, GParted queues up the operations allowing you to review, and once finished, Apply the changes you’ve made (see illustration 2).
IMPORTANT: ensure all partitions that you are applying changes to are unmounted prior to applying the changes - you can do this by right clicking and selecting Unmount on the partition (if there is no Unmount option listed or if it is disabled this means it is not mounted) - When you select Apply from the above step GParted will perform the given operations. Depending on how large the partition changes are it may take 10-30 minutes before GParted finishes the operations.
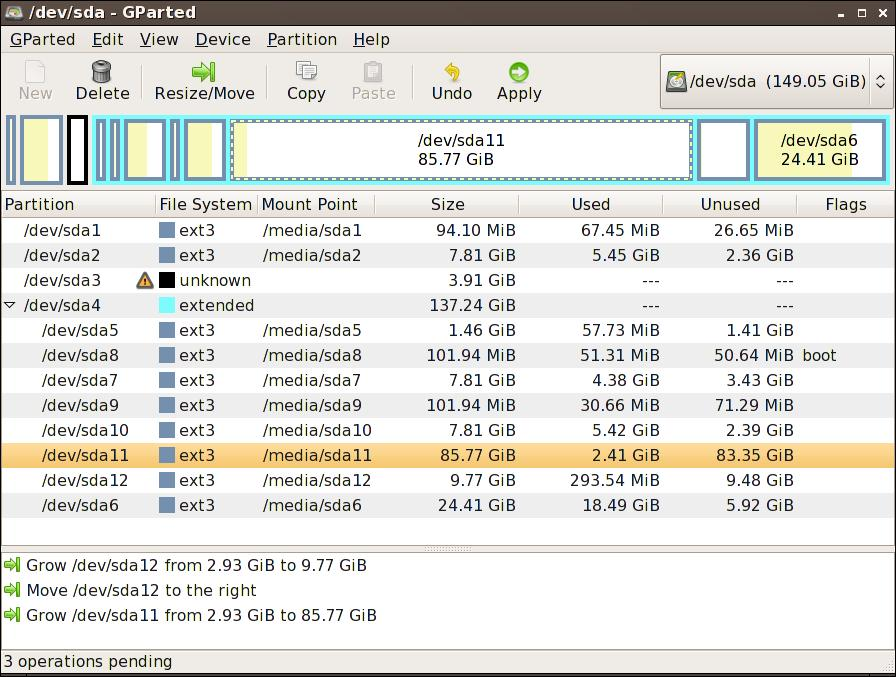
Illustration 2: New partition layout.
After performing the above steps you will now have the sda11 and sda12 partitions moved and resized. You can reboot your computer (make sure you unselect boot from CD/USB if you made these changes). After rebooting, check your home partition space as you should have a lot more room!